Requesting Payment for a Private Event
The Request Payment feature lets staff send a customer a secure link they can use to pay for a private event booking on their own, without needing to be physically present at the front desk or logged in to their Capitan account.
This article walks through how staff initiate a payment request, what the customer experiences, and how to manage requests after they've been sent.
When to use Request Payment
Request Payment is useful any time the booking customer is not in front of you and you need them to pay an outstanding balance on a private event. Common cases include:
- Collecting a deposit before an event date.
- Collecting the remaining balance after an event has been booked but before it takes place.
- Following up on an outstanding balance after the event.
At this time, the feature is available for Private Event bookings. Support for additional invoice types may be added in the future.
Sending a payment request
- Open the private event in the Staff Site and navigate to the Payment section of the event edit page.
- Click Request Payment.
- Choose the amount:
- Full Payment — the full outstanding balance on the invoice.
- Partial Payment — a specific dollar amount you enter.
- In the next modal, confirm the amount and fill out the rest of the form:
- Recipient — choose between the booking customer's email on file, or Manual Email to enter any other address (for example, a parent paying for a child's party).
- Custom note (optional) — a message that will be included in both the email and the customer's payment page. Markdown formatting is supported, and you can click Preview Email to see how the email will look before sending.
- Click Send to create the payment request and email the recipient.
An entry is added to the Activity Log recording which staff user requested the payment, and to whom the email was sent.
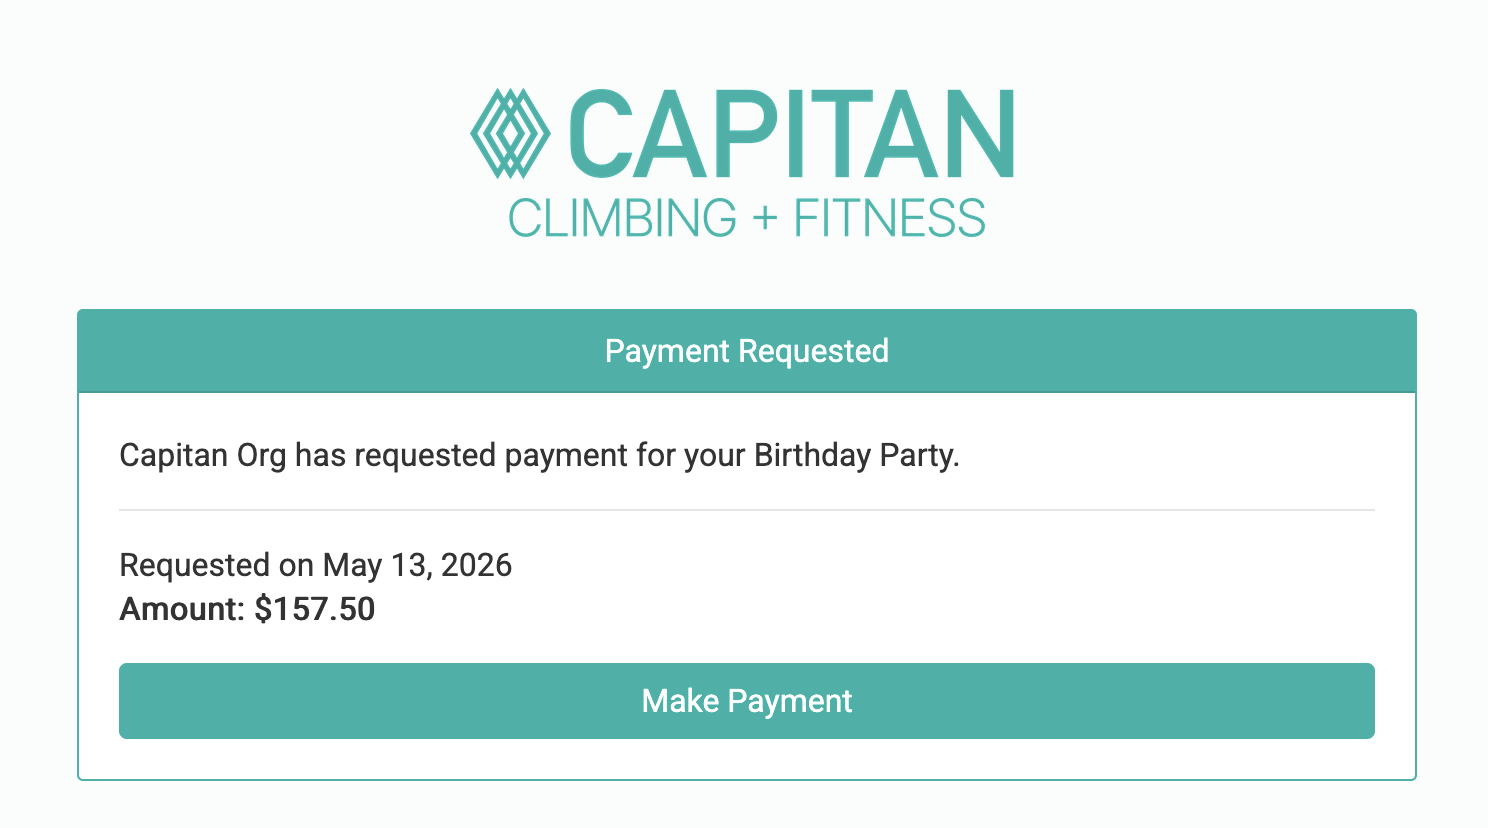
What the recipient receives
The recipient receives an email with:
- Subject line:
Payment Requested for [Event Type] - [Organization Name] - Body: the requested amount, the event type, the event date and time, your custom note (if you added one), and a Make Payment button.
> Tip: Because the sender domain is hellocapitan.com rather than your organization's own domain, some customers may not immediately recognize the message. Including a short custom note that names your org (e.g. "Thanks for booking with us at [Gym Name]!") can help reduce confusion and increase the chance the email is opened.
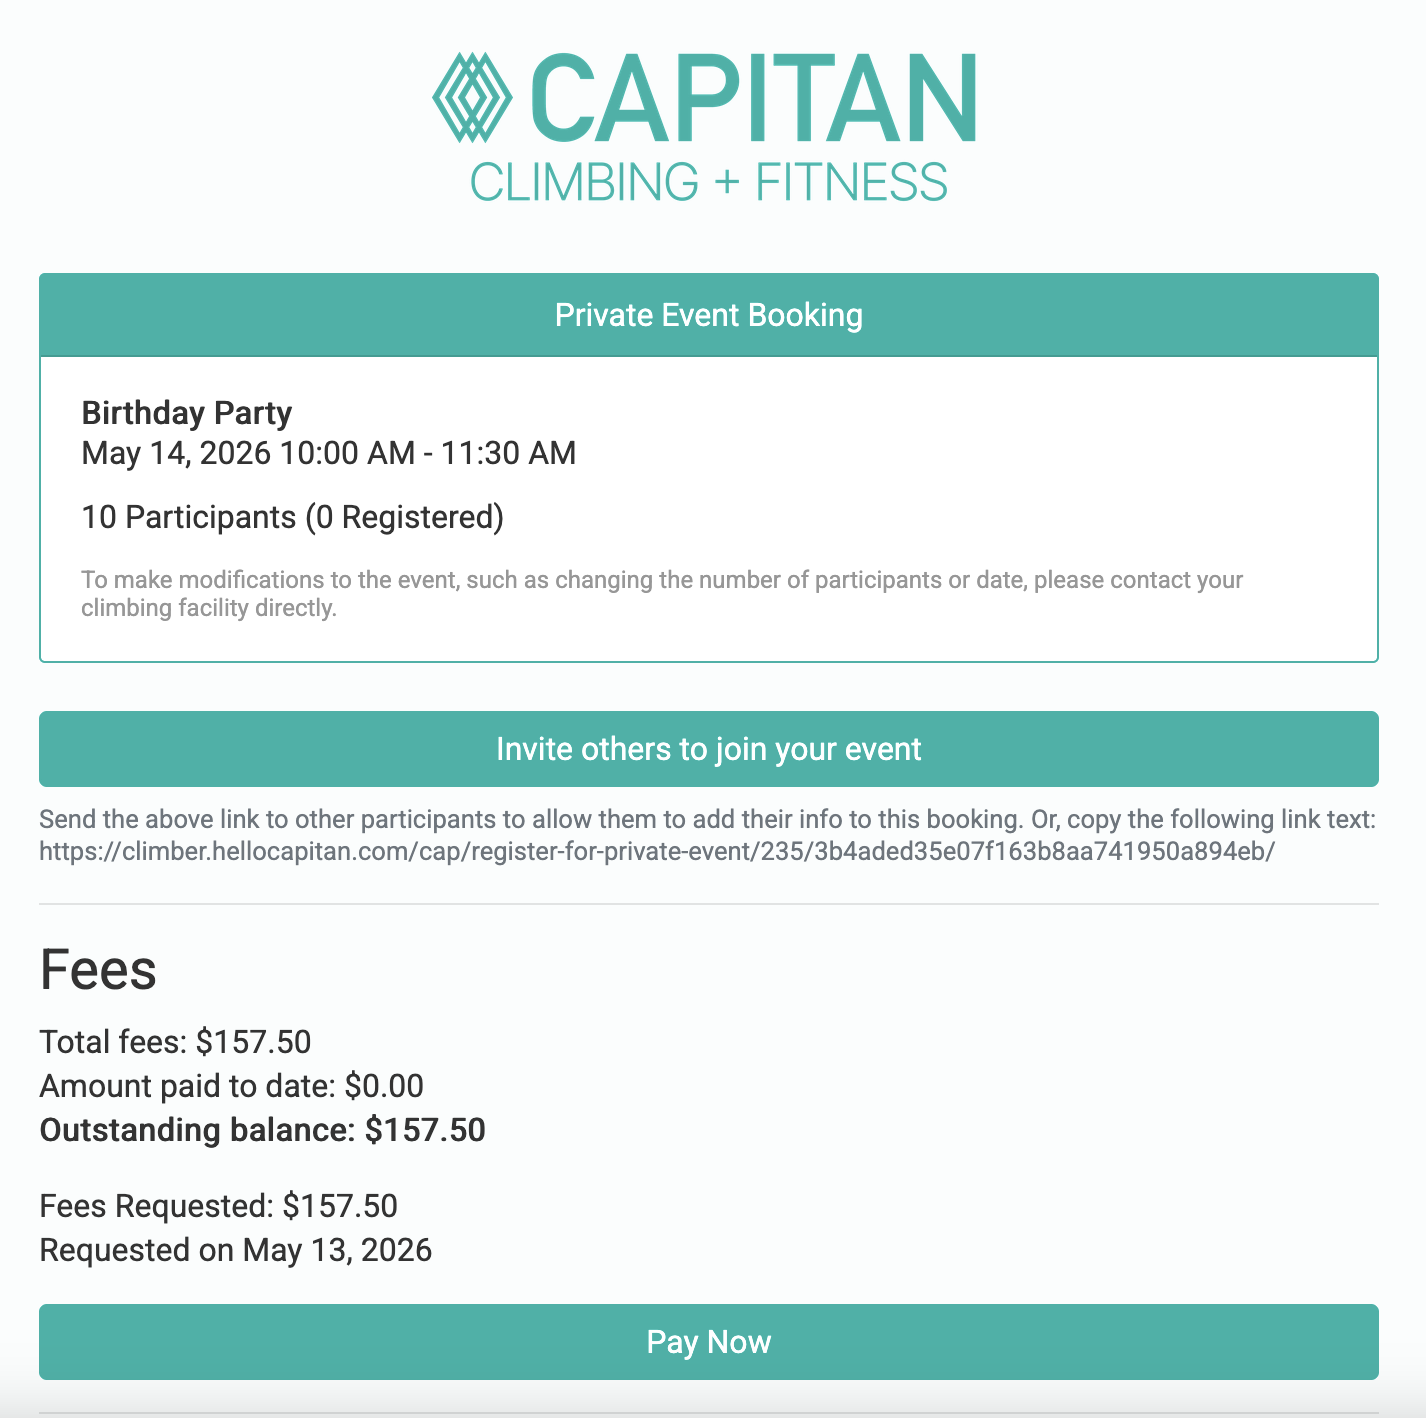
What the customer sees after clicking the link
The Make Payment button in the email opens a dedicated payment page in the Climber App. A few important things to know:
- No login is required. The link itself authenticates the customer: anyone with the link can complete the payment. This means the customer does not need to remember a password, and the recipient does not need to be the same person as the booking customer.
- The page is not specific to the customer's Climber App profile. It is a focused, single-purpose payment page for this specific request.
- The page displays:
- A description of what is being paid for (the event).
- The amount due.
- The date the payment was requested.
- Your custom note, if you provided one.
Paying with a saved card
If the booking customer already has saved payment methods on file with your organization, those cards will appear as options on the payment page. The customer can pay in one click using any of them.
> Note: The saved cards shown belong to the booking customer's Capitan profile, regardless of who the email was sent to. For example, if a parent booked the event and you send the request to the parent's spouse, the spouse will see the parent's saved cards on the payment page.
Paying with a new card
If there are no saved cards — or if the customer prefers to use a different card — they can click to enter a new card. This opens a standard checkout flow for your payment processor.
New cards entered on this page are charged one time only and are not saved to any customer profile. If you want the customer's card stored for future use, they will need to add it through their account in the normal way after logging in.
After payment
Once the payment goes through, the customer is taken to a confirmation page that includes a Manage Private Event button linking back to their event. They will also receive a receipt email automatically, using the same logic as any other Climber App payment.
Other ways the customer can find the requested payment
In addition to the email, the booking customer can also reach the payment page from two places in the Climber App:
-
The Homepage. If a customer has a pending requested payment, an alert is shown at the top of their Climber App homepage.
- The Manage Private Event screen. If the event has a pending requested payment, the following information will be shown at the bottom of the private event's Fees section:
- Fees Requested — the amount of the pending request
- Requested On — the date the request was sent
-
A Pay Now button that opens the same payment page as the email link


This gives the booking customer multiple ways to find and complete the payment if they lose track of the email.
Managing a pending request
While a payment request is pending, you'll see it listed at the bottom of the Payment History on the event's payment page, alongside two buttons:
- Resend Email — opens the same recipient picker as the original request, so you can re-send the email, optionally to a different address. This does not create a new request; it just re-sends the existing one.
- Cancel — cancels the pending request. Once cancelled, the link in the original email no longer works, and the customer will see a message explaining that the request has been cancelled if they try to use it.
While a payment request is pending, the Pay Now and Request Payment buttons are disabled for that event. To take a payment a different way (for example, charging a card in person) first Cancel the pending request, then use Pay Now. This prevents the customer from accidentally paying twice.
Both Resend Email and Cancel actions are recorded in the event's Activity Log.
Frequently asked questions
Can I send more than one payment request at the same time for the same event? No. Only one pending request can exist per invoice at a time. If you need to change the amount or the recipient, cancel the pending request first and create a new one.
Does the customer need a Capitan account to pay? No. The link in the email is self-authenticating: anyone with the link can pay. They are not asked to log in or create an account.
Is the new card saved to the customer's profile after they pay? No. New cards entered on the requested-payment page are charged once and are not stored. Saved cards shown on the page are pulled from the booking customer's existing profile.
Who can request, resend, or cancel payments? Any staff user with access to events can use these actions.
What email address does the request come from? A unique address at @hellocapitan.com tied to your org. Your organization name appears prominently in the subject line.
What happens if the customer pays from a different device than they opened the email on? The link works on any device. If the customer forwards the email to themselves or someone else, that person can also use the link to pay.